
Sharing files with clients, suppliers, contractors and other external users is a normal part of running a business. The risk comes from sharing them too broadly, giving recipients unnecessary editing rights or leaving access active after the project ends.
Microsoft 365 provides secure sharing controls in both OneDrive and SharePoint. Used correctly, they allow your team to collaborate without relying on personal email accounts, unsecured file-transfer services or uncontrolled attachments.
This Helpful Thursdays guide explains how to share files securely with external users, how OneDrive and SharePoint differ, and how to remove access when collaboration is complete.
Before You Share: Choose the Right Microsoft 365 Location
The first security decision is where the file should live.
Use OneDrive for individual or short-term sharing
OneDrive is appropriate when:
- You own the document or folder.
- You are sharing a working file with one or two external contacts.
- The collaboration is short-term.
- The file is not part of a wider team project.
For example, a director might use OneDrive to share a draft proposal with a client for review.
Use SharePoint for team or long-term collaboration
SharePoint is usually the better choice when:
- Several employees need access to the same files.
- The project will continue for weeks or months.
- The files belong to a department, project or business process.
- You need clearer ownership and easier access reviews.
- The content may need to remain available when an employee leaves.
Do not use a shared mailbox as a replacement for OneDrive or SharePoint file storage. A shared mailbox is designed for managing a common email address, not for controlling document permissions or maintaining a structured collaboration workspace.
For long-term projects, create a dedicated SharePoint site or document library. Keep confidential internal information in a separate location where external sharing is disabled. Microsoft recommends separating internal-only content from sites used for external collaboration.
Learn more about Anantek’s IT infrastructure services and IT management services.
Step 1: Check the File Before Sharing
Before opening the sharing menu, check that the document contains only the information the recipient needs.
Look for:
- Internal comments and tracked changes.
- Hidden worksheets in Excel files.
- Client or employee information unrelated to the project.
- Passwords, API keys or confidential technical details.
- File history that may reveal previous content.
- Other files stored in the same folder.
Sharing a folder can expose every item inside it, including documents added later. If the external user only needs one file, share the file rather than the entire folder.
A simple rule is: share the smallest amount of information with the fewest people for the shortest necessary period.
Step 2: Open the OneDrive or SharePoint Sharing Menu
The steps are similar in OneDrive and SharePoint.
- Sign in to Microsoft 365 using your work account.
- Open OneDrive or navigate to the relevant SharePoint site.
- Locate the file or folder.
- Select the item and choose Share.
You can also right-click the file or select the three-dot menu beside it, then choose Share.
If the Share option is unavailable, your organisation may have restricted external sharing. Contact your Microsoft 365 administrator or IT support team rather than moving the file to an unauthorised service.
Step 3: Choose “Specific People” in Link Settings
The sharing link type controls who can access the file.
Select the current link setting, which may appear as Anyone with the link, People in your organisation or a similar option. Then choose:
Specific people
This is the safest default for most external sharing. The link is intended for the people you name, rather than anyone who happens to receive or forward it.
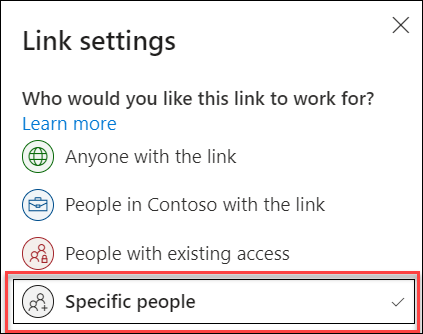
Avoid Anyone with the link for confidential or commercially sensitive information. Anyone links do not require the recipient to sign in, and recipients can forward them. Anyone who receives the link may then be able to access the file.
Anyone links may be suitable for low-risk material, such as a public brochure or an event timetable, but they should not be your standard approach for business documents.
Step 4: Enter the External Recipient’s Email Address
Enter the email address of each person who needs access.
Use individual addresses rather than a generic address wherever possible. This gives you a clearer record of who has access and makes it easier to remove one person without affecting everyone else.
Check the addresses carefully before sending. A single typing error can send a confidential document to the wrong person.
You can add an optional message explaining:
- What the file contains.
- Why you are sharing it.
- What action the recipient should take.
- When access will be removed.
- Who to contact with questions.
Do not place passwords or sensitive information in the message. If a document requires a separate password, send it through a different communication channel.
Step 5: Set the Minimum Required Permission
By default, Microsoft 365 may offer recipients permission to edit the file. Change this unless editing is genuinely required.
Choose one of the following:
- Can view – the recipient can open and read the file.
- Can edit – the recipient can change the file and, depending on the item, may be able to add or delete content.
- Block download – where available, the recipient can view the file online but cannot download it through the sharing experience.
For most external sharing, select Can view.
Use Can edit only when you need the recipient to make changes directly. For example, a client may need to update a project brief or approve specific content. If the recipient only needs to review a document, editing access creates unnecessary risk.
For sensitive documents, open Link settings, remove editing permission and enable Block download if the option is available.
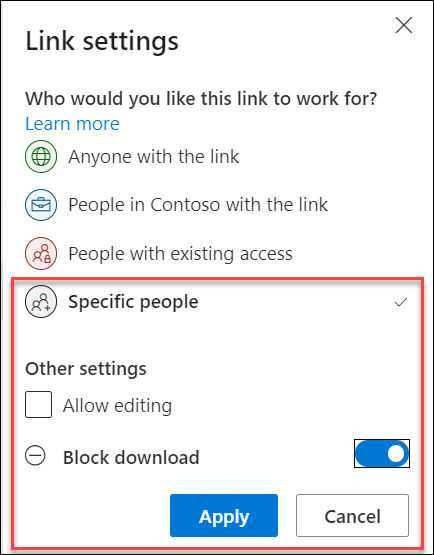
Block download is an additional control, not a guarantee that information cannot be copied. A viewer may still take a screenshot or photograph the screen. Use it to reduce casual downloading and uncontrolled local copies.
Step 6: Add an Expiry Date Where Available
If Microsoft 365 provides an expiry option for the link, use it for temporary access.
An expiry date is useful for:
- Tender documents.
- Draft contracts.
- Temporary supplier access.
- Project files shared during a defined period.
- Documents sent for one-time review.
Set the expiry date to match the business requirement rather than choosing an unnecessarily long period. If access is needed later, you can create a new link or extend access after review.
Availability of expiry settings depends on your Microsoft 365 configuration, sharing method and administrator policies. If you cannot set an expiry date, create a reminder to review the link manually.
Step 7: Send the Link Through Microsoft 365
Select Send to deliver the invitation through Microsoft 365, or choose Copy link if you need to place it in an approved business email.
The recipient’s experience depends on their account and your organisation’s settings. They may be asked to:
- Sign in with a Microsoft account.
- Use their work or school account.
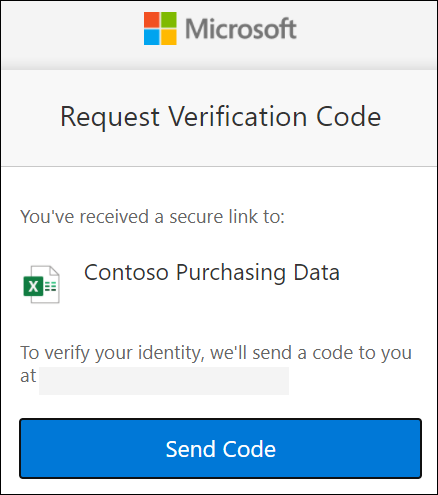
- Enter a one-time passcode sent to their email address.
A recipient without a Microsoft account may still be able to verify their identity using a one-time passcode, depending on your organisation’s configuration.
Advise external users to confirm that the email is genuine and that the sender address is correct. If they did not expect the invitation, they should contact you through a known channel before opening it.
Step 8: Confirm What the Recipient Can Access
After sending the link, review the file’s access details.
- Select the file in OneDrive or SharePoint.
- Open the Details panel or three-dot menu.
- Select Manage access.
- Review the people, groups and links listed.
Check that:
- Only the intended recipients are listed.
- Their permissions are correct.
- There is no unnecessary organisation-wide link.
- A previous Anyone link has not been left active.
- The file has not inherited broader permissions from its folder or SharePoint site.
This is especially important when sharing files from a folder that has already been shared with other people.
Step 9: Remove External Access When the Work Is Complete
External access should not remain active indefinitely.
When collaboration ends:
- Select the file or folder.
- Open Manage access.
- Find the external recipient or sharing link.
- Select the relevant menu.
- Choose Remove access, Stop sharing or delete the link.
If you shared an Anyone link, deleting that link is essential. Removing one named recipient will not necessarily disable an anonymous link that they or someone else can still use.
Microsoft’s guidance explains that access can be stopped by removing permissions from the item, removing the guest from your directory or deleting the relevant Anyone link.
Administrator Controls for Safer External Sharing
Individual users can share securely, but organisation-wide settings provide stronger protection.
Microsoft 365 administrators should review the following controls in the SharePoint admin centre:
Restrict the available sharing options
Set SharePoint and OneDrive to a conservative external-sharing level. Many organisations disable Anyone links and allow sharing only with new and existing guests.
The most restrictive setting applies when organisation-level and site-level settings differ.
Limit sharing by domain
Use domain allowlists or denylists to control which external organisations can receive shared files. For example, you may allow sharing with approved client and supplier domains while blocking competitor domains.
Remember that domain restrictions work best when Anyone links are disabled.
Restrict who can share externally
Microsoft 365 can limit external sharing to members of specific security groups. This supports an approval process and prevents every employee from inviting external users without oversight.
Protect sensitive SharePoint sites
Turn off external sharing for HR, legal, finance, leadership and other sites containing confidential information. Create separate SharePoint sites for approved external collaboration.
Add broader security controls
Depending on your Microsoft 365 licensing and risk profile, consider:
- Multifactor authentication for guest users.
- Conditional Access policies.
- Sensitivity labels.
- Data Loss Prevention policies.
- Guest-user reviews.
- Regular access and link audits.
- Backup and recovery testing.
These controls help ensure that Microsoft 365 remains reliable, secure and manageable as your business grows.
Secure External Sharing Checklist
Before selecting Send, confirm:
- The file is stored in the correct OneDrive or SharePoint location.
- The document contains only the required information.
- You selected Specific people.
- You entered the correct recipient addresses.
- Editing is disabled unless it is necessary.
- Block download is enabled where appropriate.
- An expiry date is set where available.
- You know when access should be removed.
- You have checked the file’s current permissions.
Need Help Managing Microsoft 365 Security?
Secure file sharing depends on more than clicking the right option. Your Microsoft 365 tenant settings, SharePoint structure, guest policies, backups and user training all affect the level of protection you achieve.
If your business needs clearer Microsoft 365 governance or responsive IT support for small businesses, Anantek Solutions can help review your configuration and improve the way your systems are managed.
For a practical assessment of your file-sharing permissions, security controls and wider IT environment, contact Anantek Solutions to arrange a consultation.